While Summit Route has been busy developing it’s first product, we needed the ability modify a signed file. In this post I describe why that was needed and release a tool to help others with this problem.
Update 2015.03.11: These changes have now been integrated into the official osslsigncode project at http://sourceforge.net/p/osslsigncode/osslsigncode/ci/master/tree/
Why do this?
Code signing files is a best practice that proves where a file came from and that it has not been modified. However, for our product, we wanted the ability for someone to log into our site, and download an installer that is already configured for their account.
Some techniques that could have been used:
- Don’t sign the installer and just modify it.
- Bad because code signing is a best practice and you should follow it.
- Sign the installer, but then have users re-type their account info when they install it.
- Bad because of horrible usability in the case where this software needs to be installed on thousands of systems with the same configuration info.
- Modify the installers on the server and sign them on-the-fly.
- Bad because your code signing cert should never be on an Internet connected system.
- Code sign the installer, then add the configuration data without breaking the signature.
- Best option, but no easy way until now.
Who does this and how?
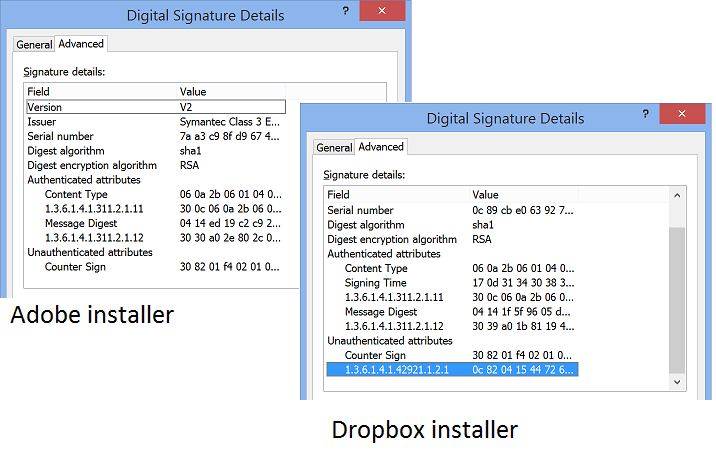
Dropbox discussed how they modified their code-signed file here, and GoToMeeting uses the same technique for their installer. The high-lighted object in the image below shows the configuration data added to the Dropbox installer (on the right) compared with a “normal” code-signed file (an Adobe installer on the left).
To understand how this is done, realize that “code signing” requires two main steps.
- Calculate an image hash of the file in a special way and then sign that with your code signing certificate’s private key.
- Timestamp the signed file using a public timestamping server.
Many people seem to do this at the same time on the same system, but the best practice is to perform the first step on a system that is not connected to the Internet (to ensure security of the code-signing certificate’s private key), and the second step must be done on a system that is connected to the Internet.
So given that timestamping is modifying the signed file, some digging will show you that the timestamp is written to an Unauthenticated attribute in the signature. What the previously mentioned companies do is add an additional object within that attribute with their custom data.
What we’ve done
Although the technique is known, no one has released code to allow people to do it. Summit Route is releasing code to do this, which is based on a fork of Per Allansson’s osslsigncode (he has been contacted to see if he wants to put any of this into the official project).
Warning
This tool can enable developers to do dumb things very easily, so please use responsibly. Specifically, understand that any data you put in the unauthenticated region this tool creates, can be modified by an attacker. As an example, in the past some folks have used a similar technique for a bootstrap installer that included a URL that the installer would download and install the rest of the package without checking if they downloaded the correct file.
Microsoft has tried to clamp down on these bad practices with MS13-098, which stops developers from just writing to the end of certificate data directory which used to be possible. Eric Lawrence does a great job of discussing these problems and various techniques that can be used in his post.
So be careful what you put in this region and treat it as if it were untrusted data.
Where to get it
Summit Route’s fork of osslsigncode can be found on our Github page at https://github.com/SummitRoute/osslsigncode-fork.