This article should be read in combination with Creating disaster recovery backups which discusses best practices for backups including how to encrypt them properly. This article describes how to:
- Setup a location on Amazon Web Services (AWS) for your backups.
- How to create users with limited permissions to perform the tasks needed in having a backup system.
- How to get your files there and back out.
Choosing your storage class
AWS offers three types of storage depending on your access needs: S3 (Simple Storage Service), S3 IA (S3 Infrequent Access), and Glacier. S3 is the main storage class, and Glacier is more specifically for backups. S3 IA is an in-between class with cheaper storage than S3, but with higher retrieval costs.
Glacier can take up 5 hours to retrieve data from it. Glacier offers expedited retrieval as well, for an added cost, that reduces the retrieval time down to 5 minutes. We’ll only consider normal Glacier retrievals for this article, which is good enough for most Disaster Recovery plans, because in the event that your entire business get’s wiped out, there are a lot of other things you’ll be doing in the first 5 hours.
Glacier also offers something called Vault Lock, which can be used to enforce “Write Once Read Many” (WORM) policies, that are immutable, so even if someone compromises your root account at AWS, they can’t destroy your backups.
Let’s look briefly at the costs and other considerations of Glacier. Given that we’re doing nightly backups, we don’t need to worry about some things, such as cost per object creation that range from $0.005 to $0.05 per 1000 requests, or per object retrieval, because I assume we’re just storing one or handful of large blobs per night and for disaster recovery we’ll only be retrieving one of those nightly sets of blobs.
| S3 | S3 IA | Glacier | |
|---|---|---|---|
| Cost per GB storage (first 50TB/month) | $0.023 | $0.0125 | $0.004 |
| Minimum storage time | N/A | 30 days | 90 days |
| Retrieval time | Instant | Instant | Up to 5 hours (or as little as 5 minutes for more money) |
| Retrieval cost | N/A | $0.01/GB | $0.10/GB (standard, $0.01/GB retrieval + $0.09/GB data) |
So let’s say you had 100GB that you wanted to do nightly backups of that you keep for one year. After one year with Glacier, this would cost you $1752/yr. This can be compared with Google Compute Engine (GCE) which costs $3066/yr for the same thing due to its $0.007/GB/month storage cost. Additionally, as I’ll discuss, you get a lot of additional benefits with AWS, with regard to permissions and policies, that GCE doesn’t offer.
Retrieval from Glacier for this 100GB will cost $10. Please refer to the official docs to confirm pricing for your situation. There are a number of articles such as How I ended up paying $150 for a single 60GB download from Amazon Glacier, but as far as I can tell that is based on an older pricing model.
AWS has thought a lot about Disaster Recovery for businesses, so they offer all sorts of additional capabilities, such as being able to ship you actual hard-drives full of your data if you have so much that a truck full of hard-drives is faster than downloading the data over the Internet. See their white paper on Disaster Recovery for more.
Setup location and accounts
Once you have an account with AWS, we’ll first create the location where backups will be saved.
Create location
First, we need to setup the location to store our backups. From the AWS console, click the “Services” menu and search for “Glacier”.
You should now be at https://console.aws.amazon.com/glacier/home and see a welcome screen, where you’ll click “Get started”.
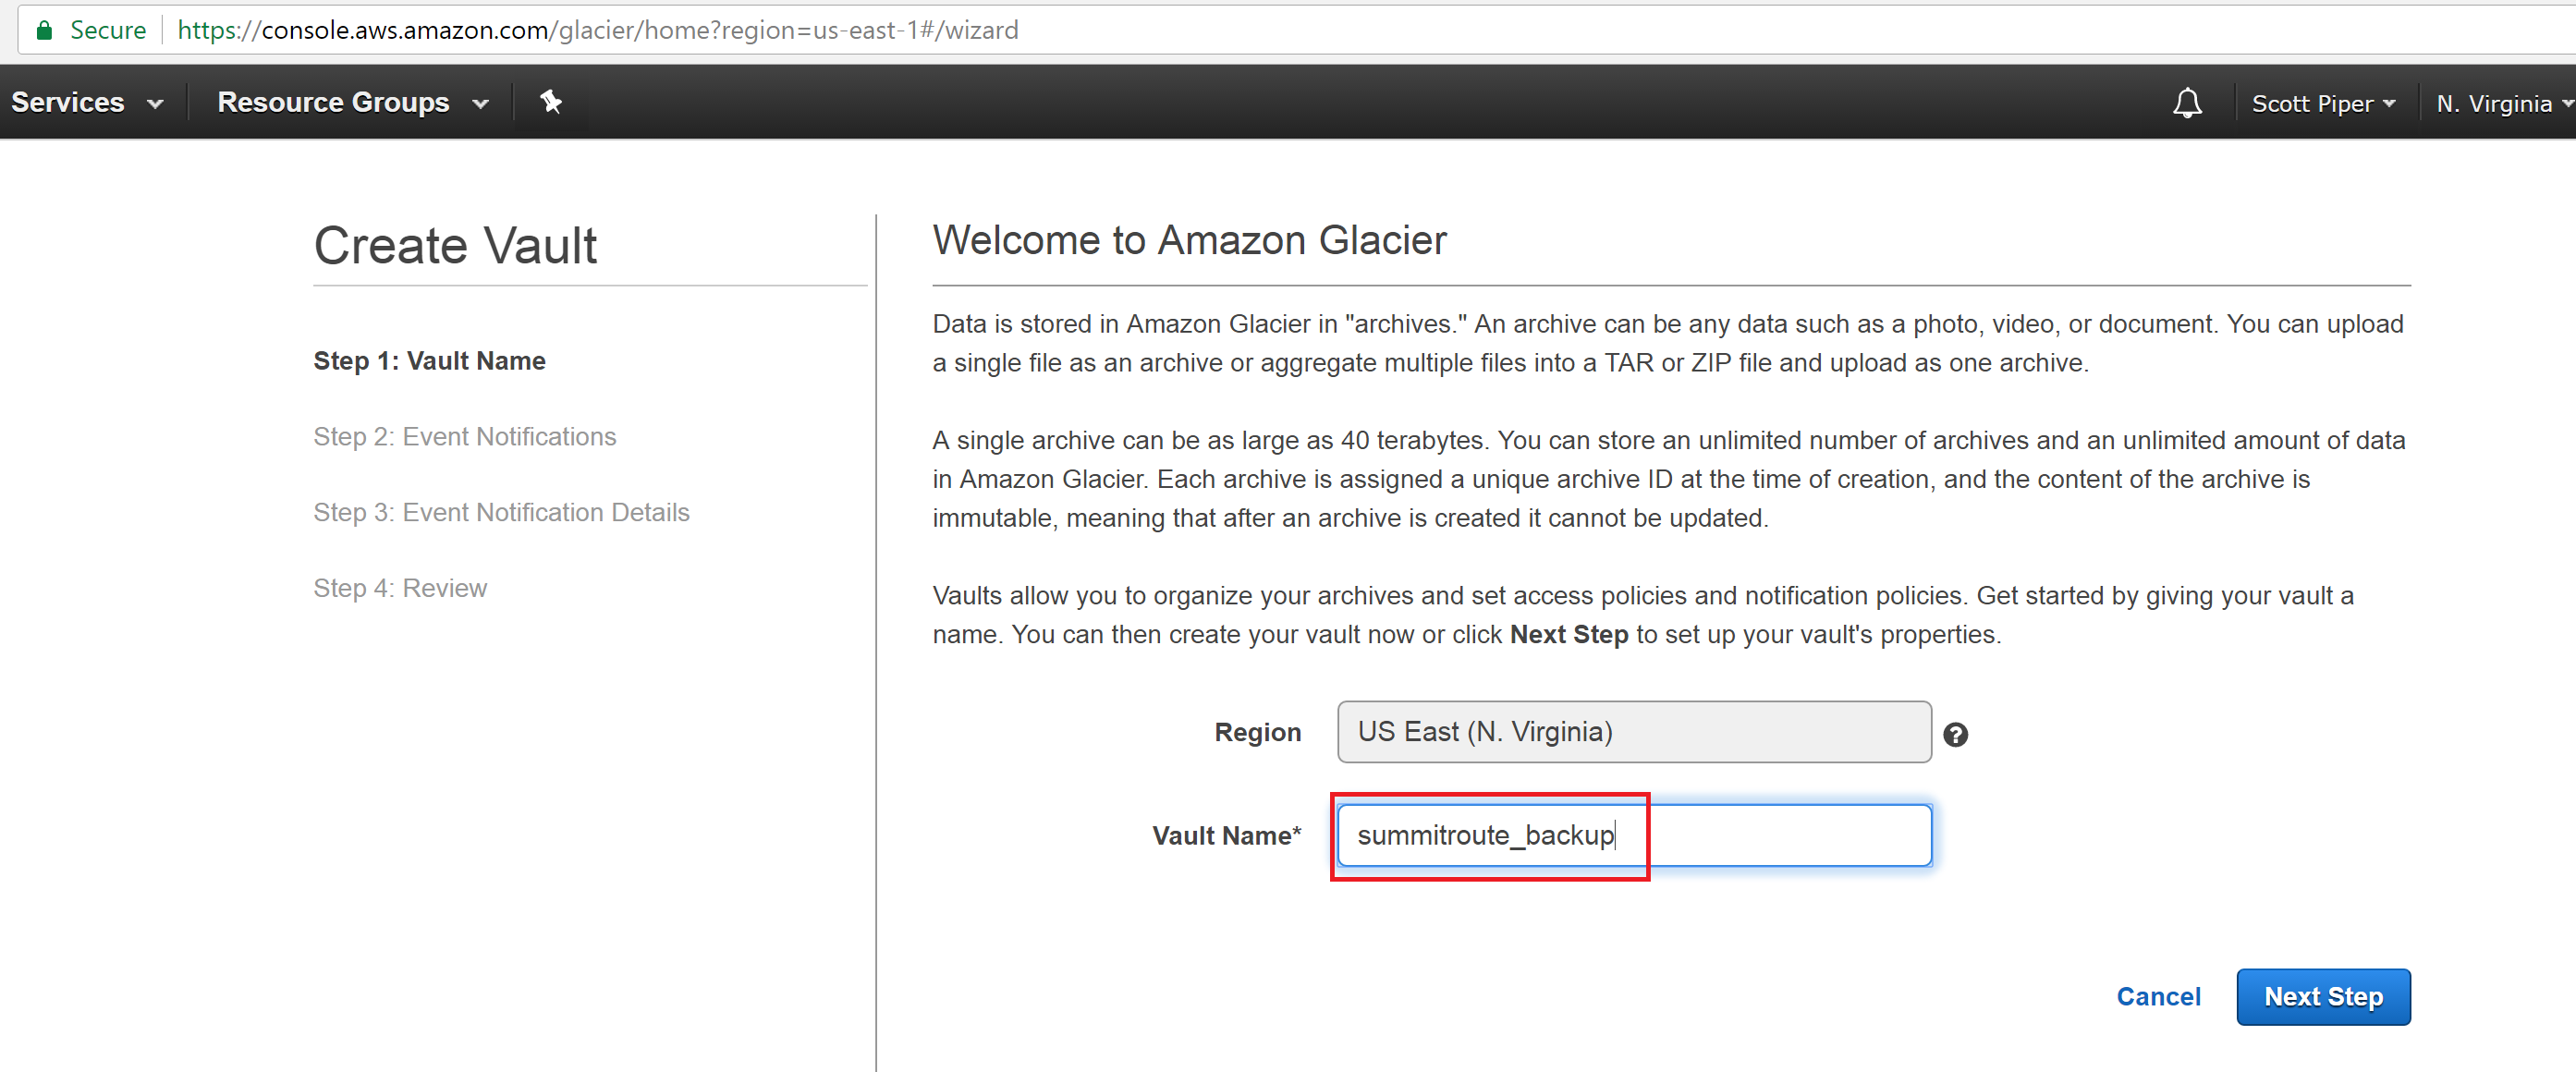
Enter the name of your Vault.
Leave the default “Do not enable notifications”
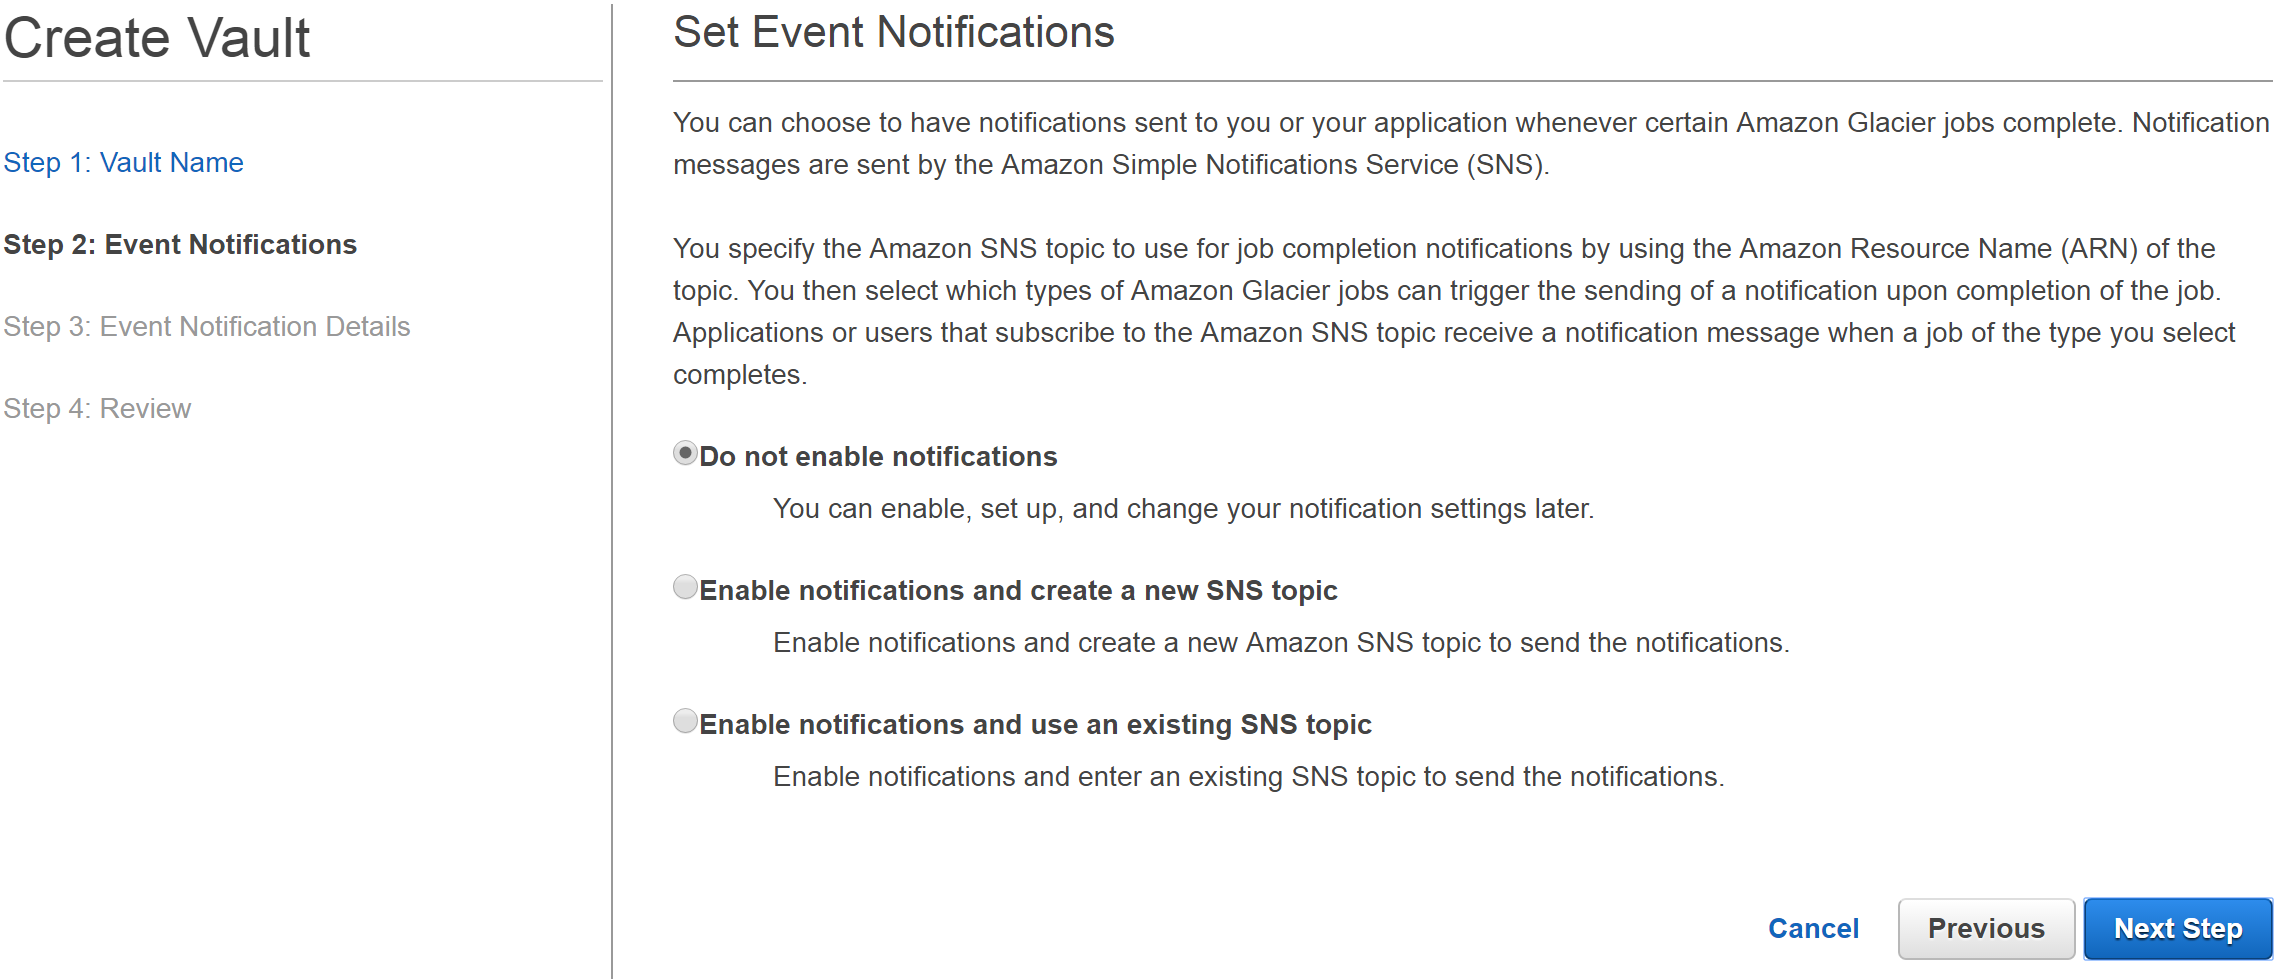
Hit Submit on the Review screen.

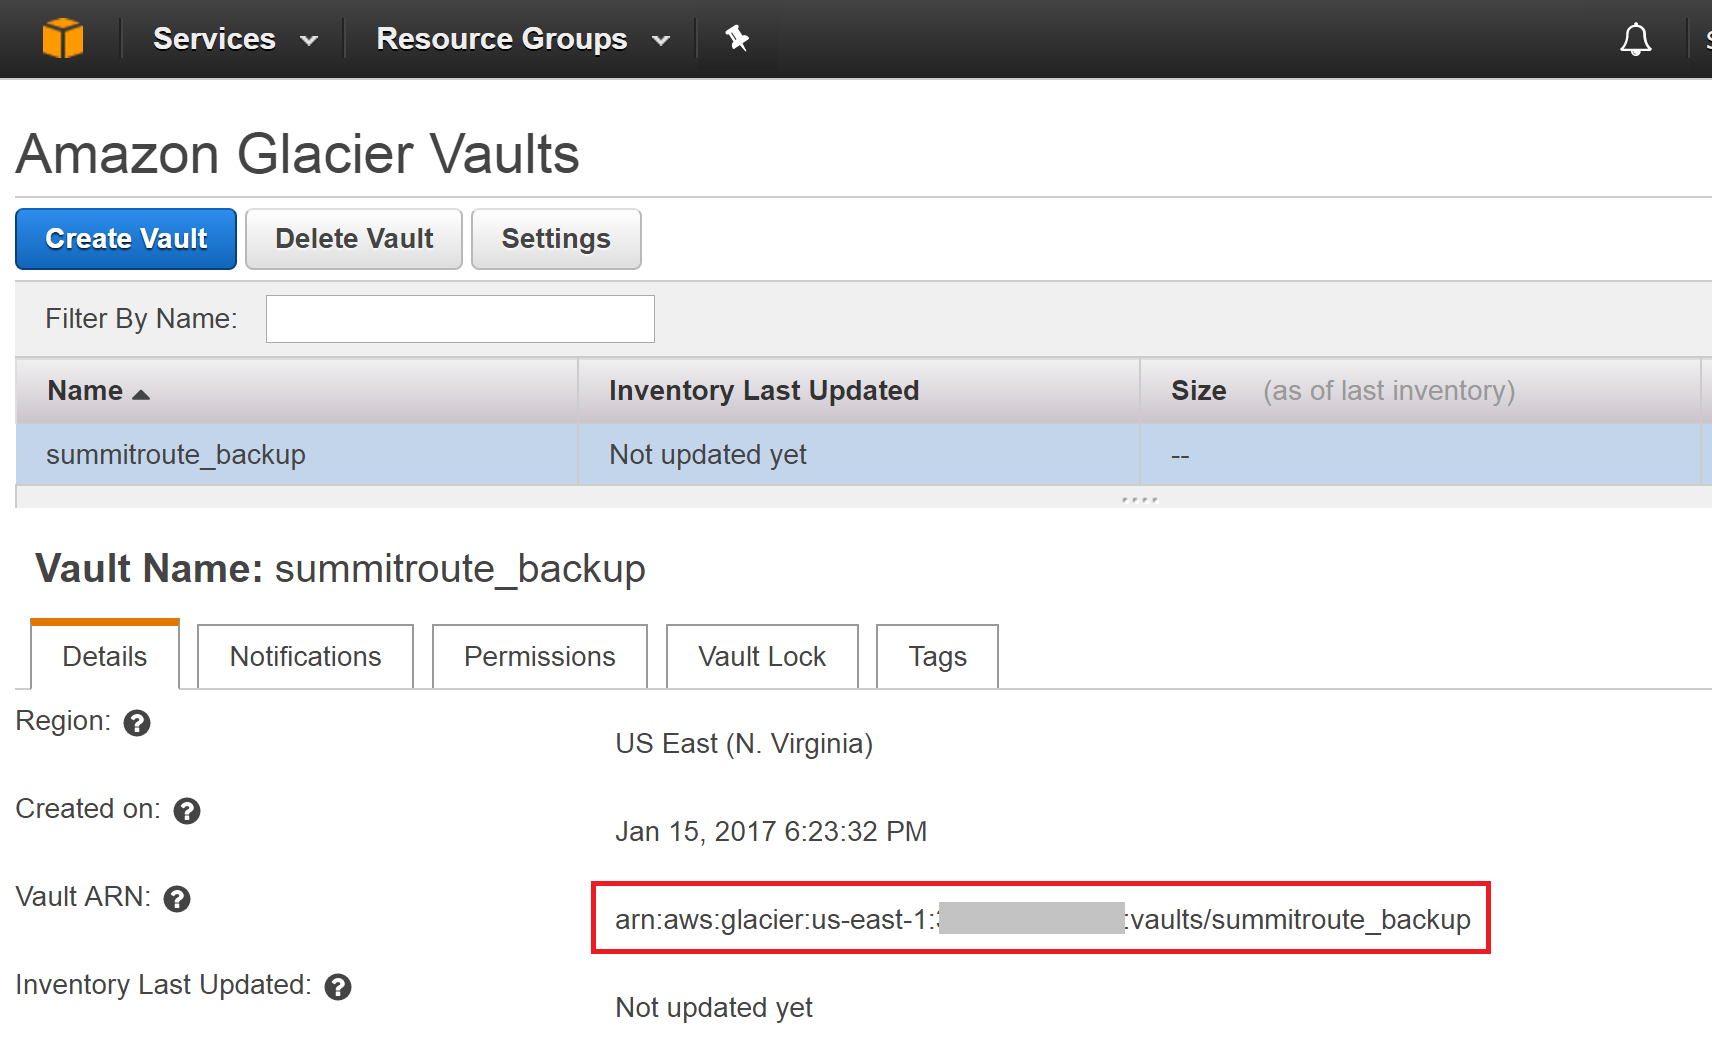
The Glacier Vault has now been created.
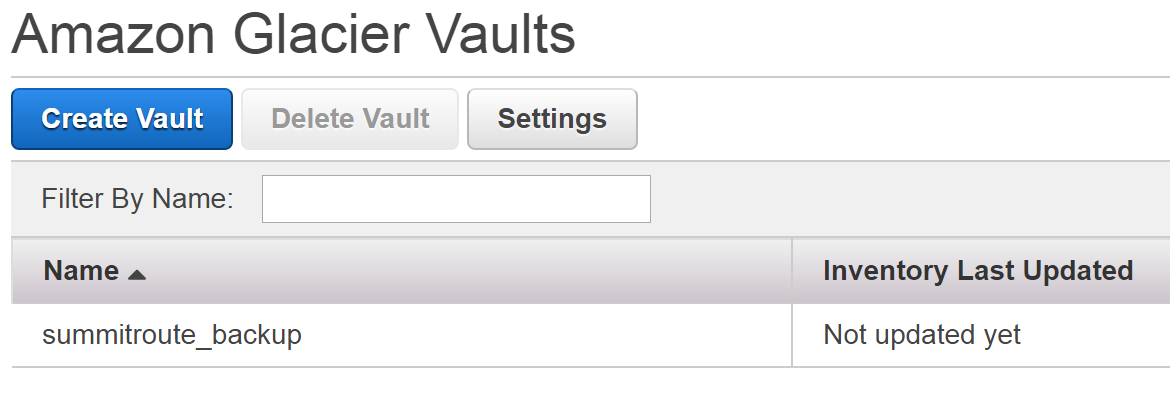
Click on your Vault and write down your Vault ARN (Amazon Resource Name) for later, which will look like: arn:aws:glacier:us-east-1:1234567890:vaults/summitroute_backup where 1234567890 is your Account Number. If you ever need that number, it can be easily found by looking at the top of https://console.aws.amazon.com/support/ or many other places throughout the AWS console.
Create a service account to write the backups
We now need an account to write our backups to Glacier. First, we’ll create a policy that only allows writing to the Vault, and then we’ll create a user with this policy assigned to it.
Create policy with write-only permission
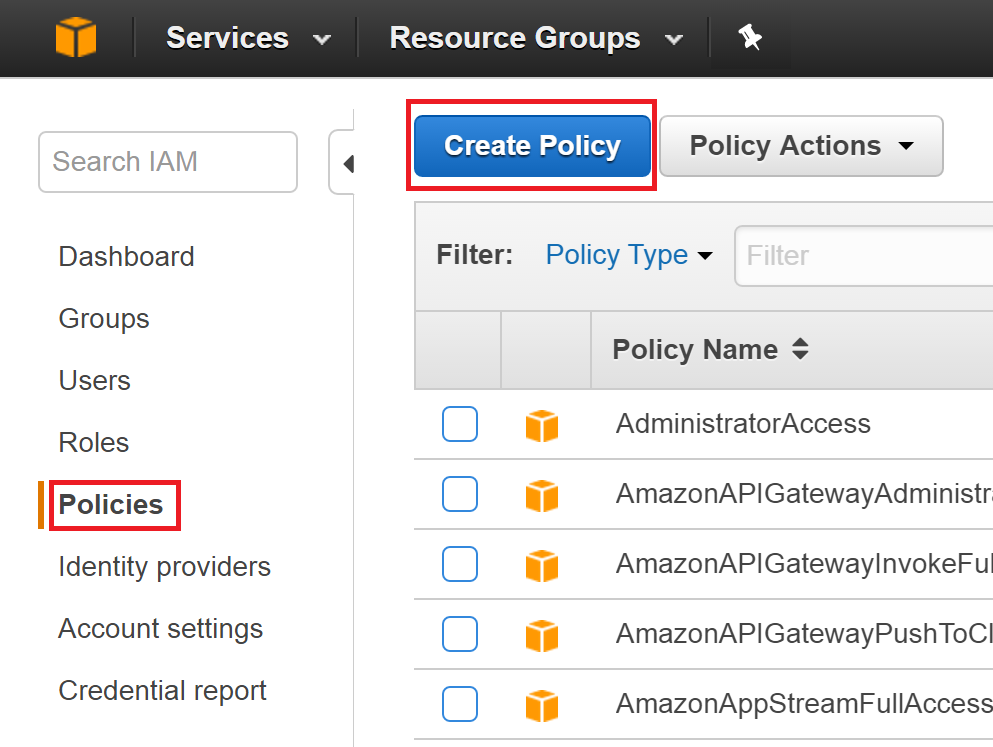
Click on “Services” again and search for IAM, so you’re taken to https://console.aws.amazon.com/iam
Select “Policies”, then “Create policy”.
Click “Create your own policy”
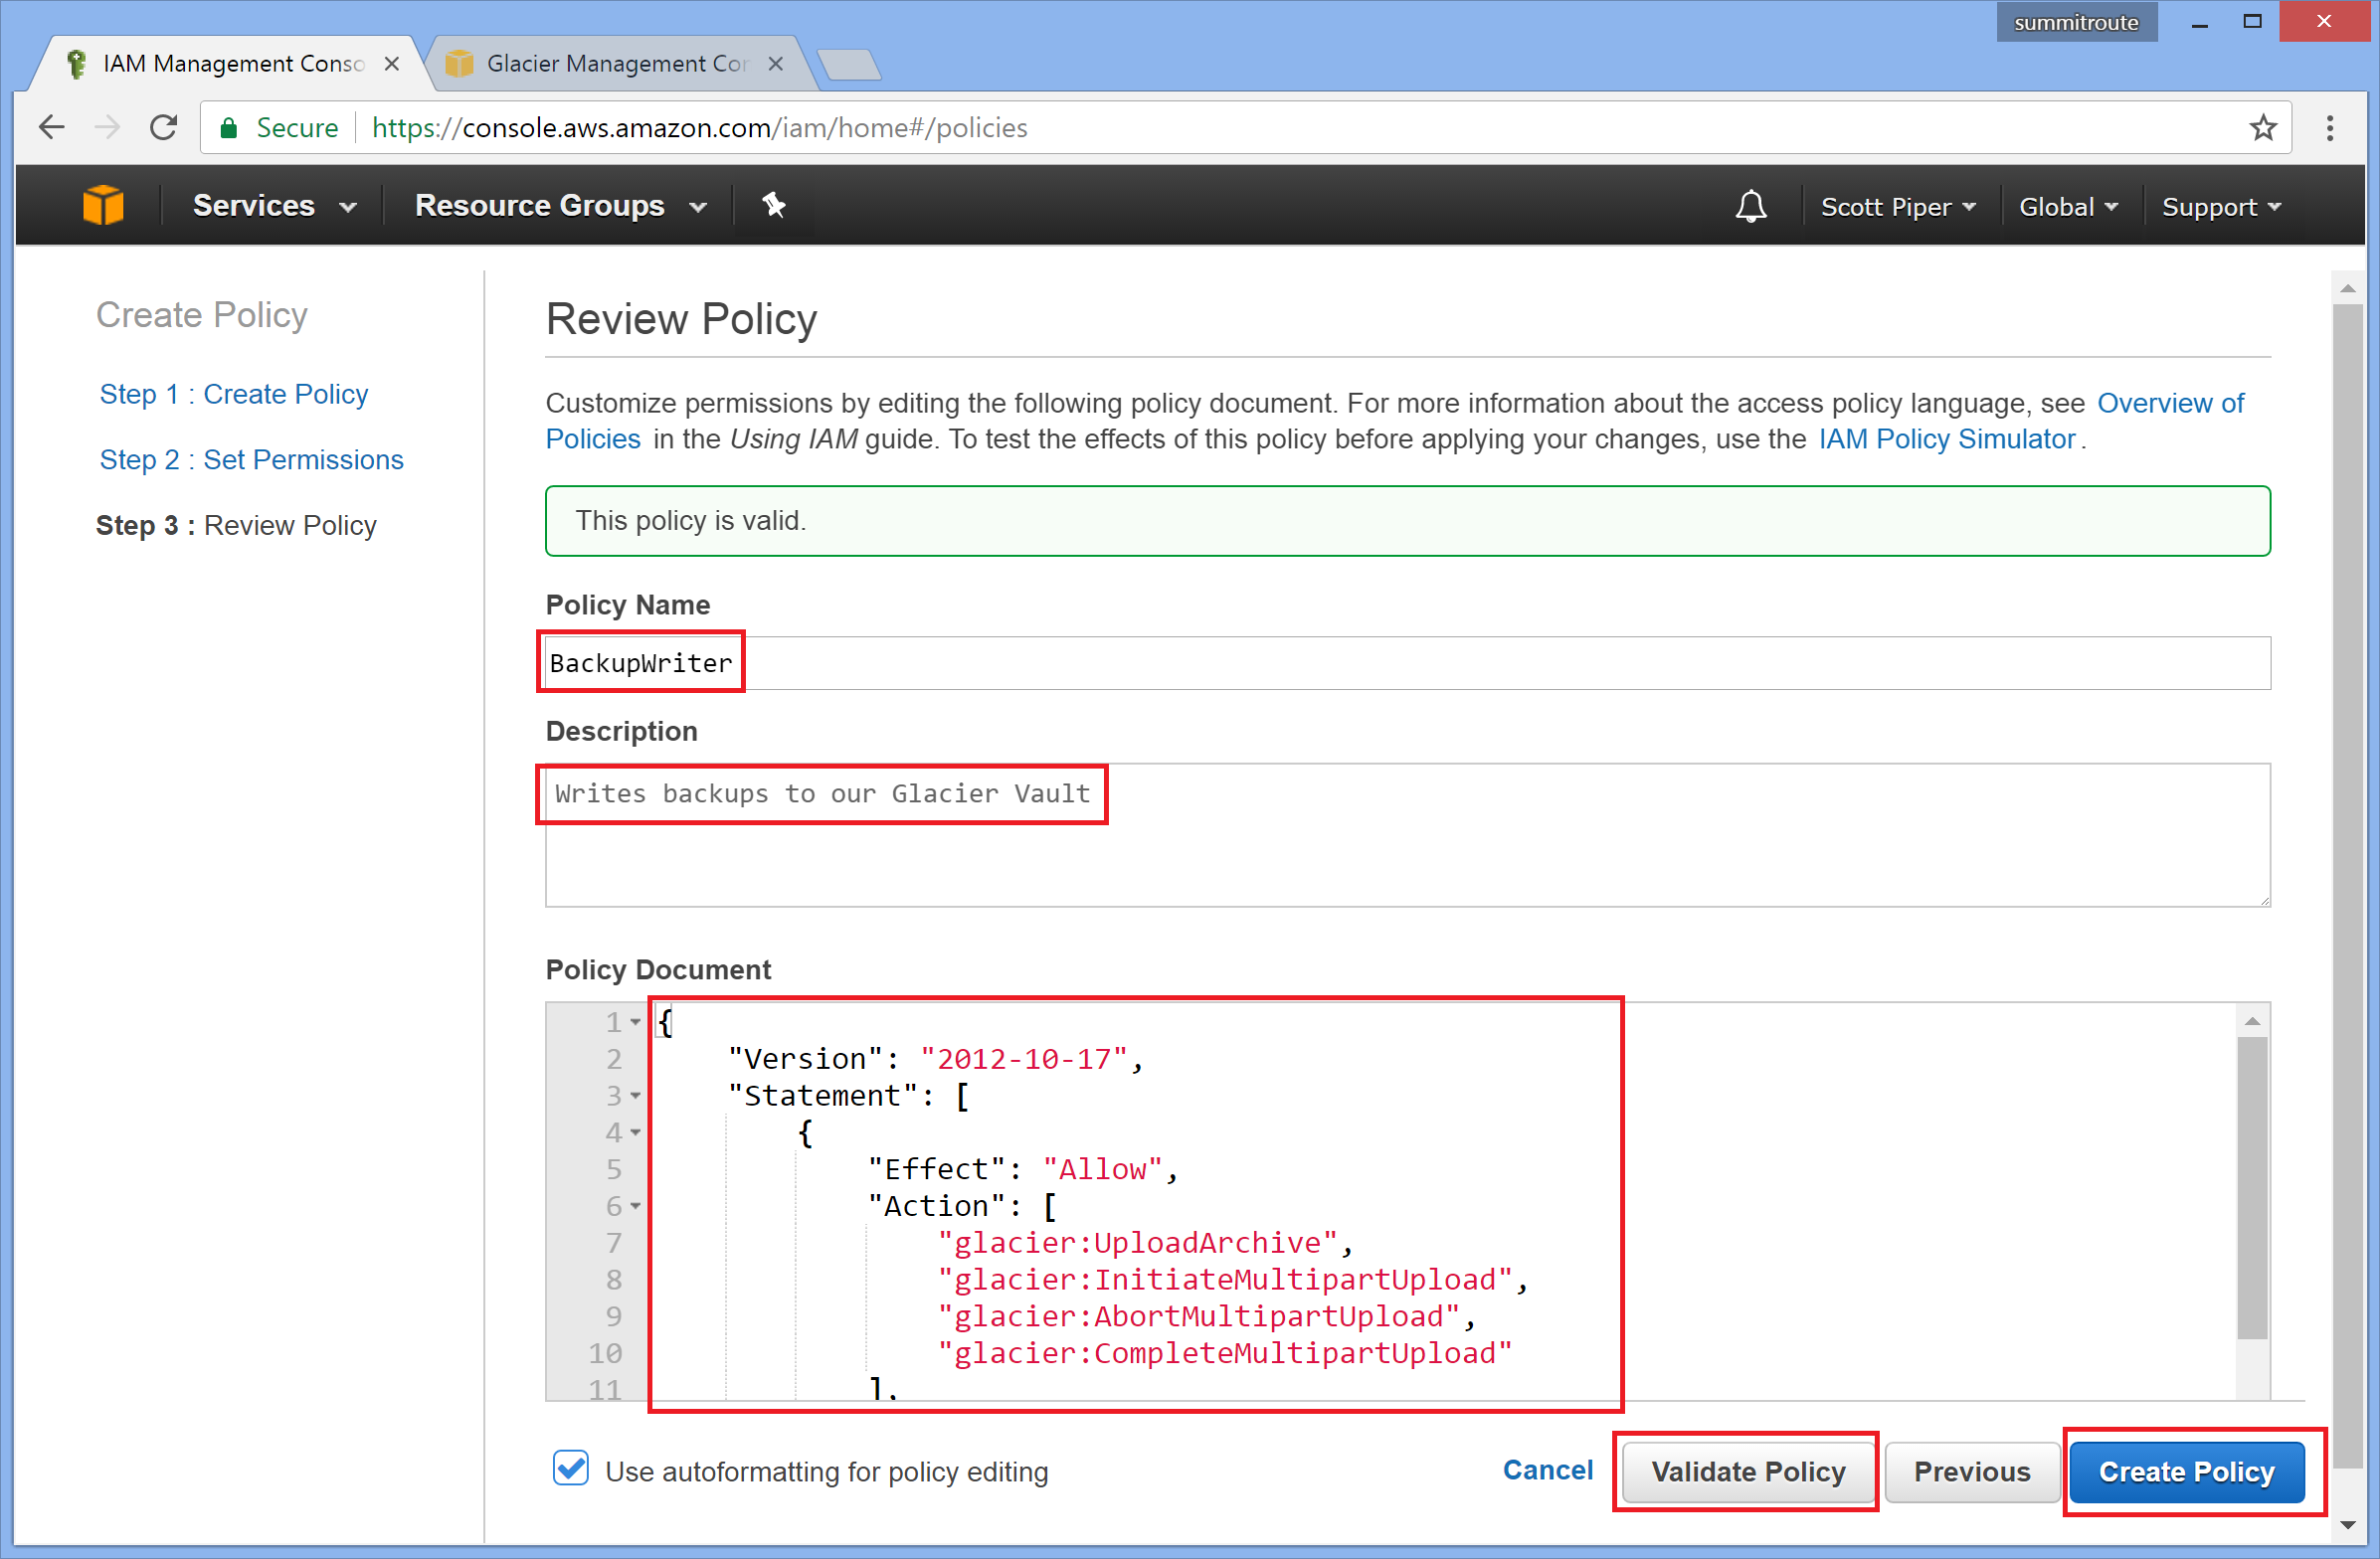
Name the policy “BackupWriter”, give it a description, and copy/paste in the policy:
{
    "Version": "2012-10-17",
    "Statement": [
        {
            "Effect": "Allow",
            "Action": [
                "glacier:UploadArchive",
                "glacier:InitiateMultipartUpload",
                "glacier:AbortMultipartUpload",
                "glacier:CompleteMultipartUpload"
            ],
            "Resource": "arn:aws:glacier:us-east-1:1234567890:vaults/summitroute_backup"
        }
    ]
}
Change the ARN to the one you wrote down previously. “Validate” your policy, and then click “Create Policy”.
Create the user and apply this policy
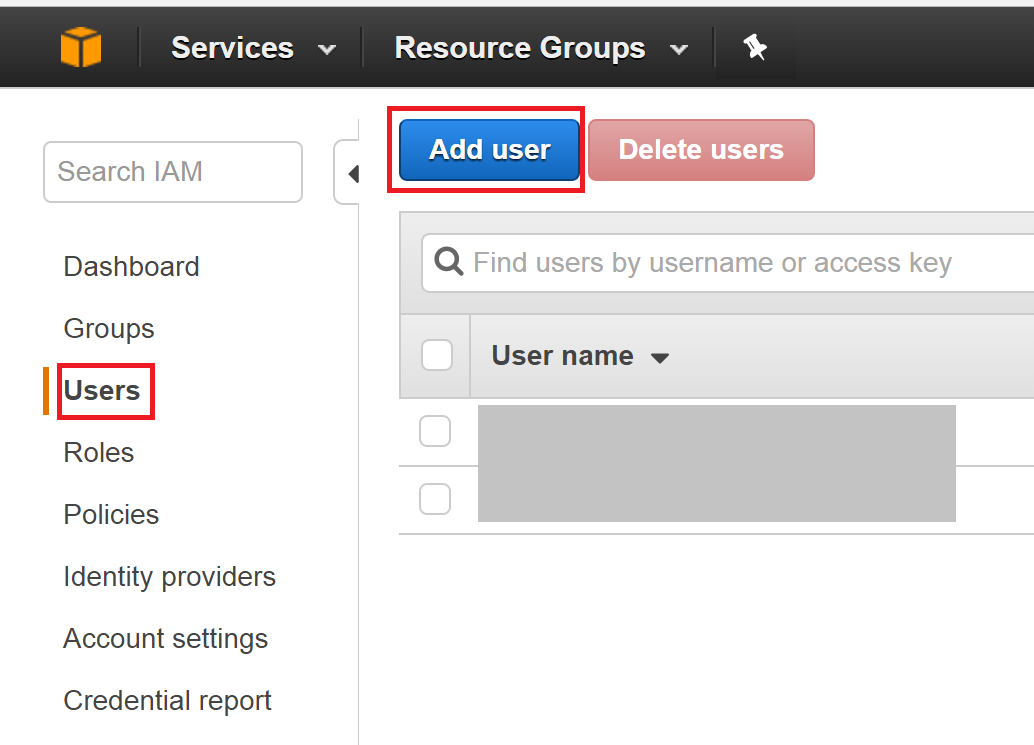
Choose Users -> Add user
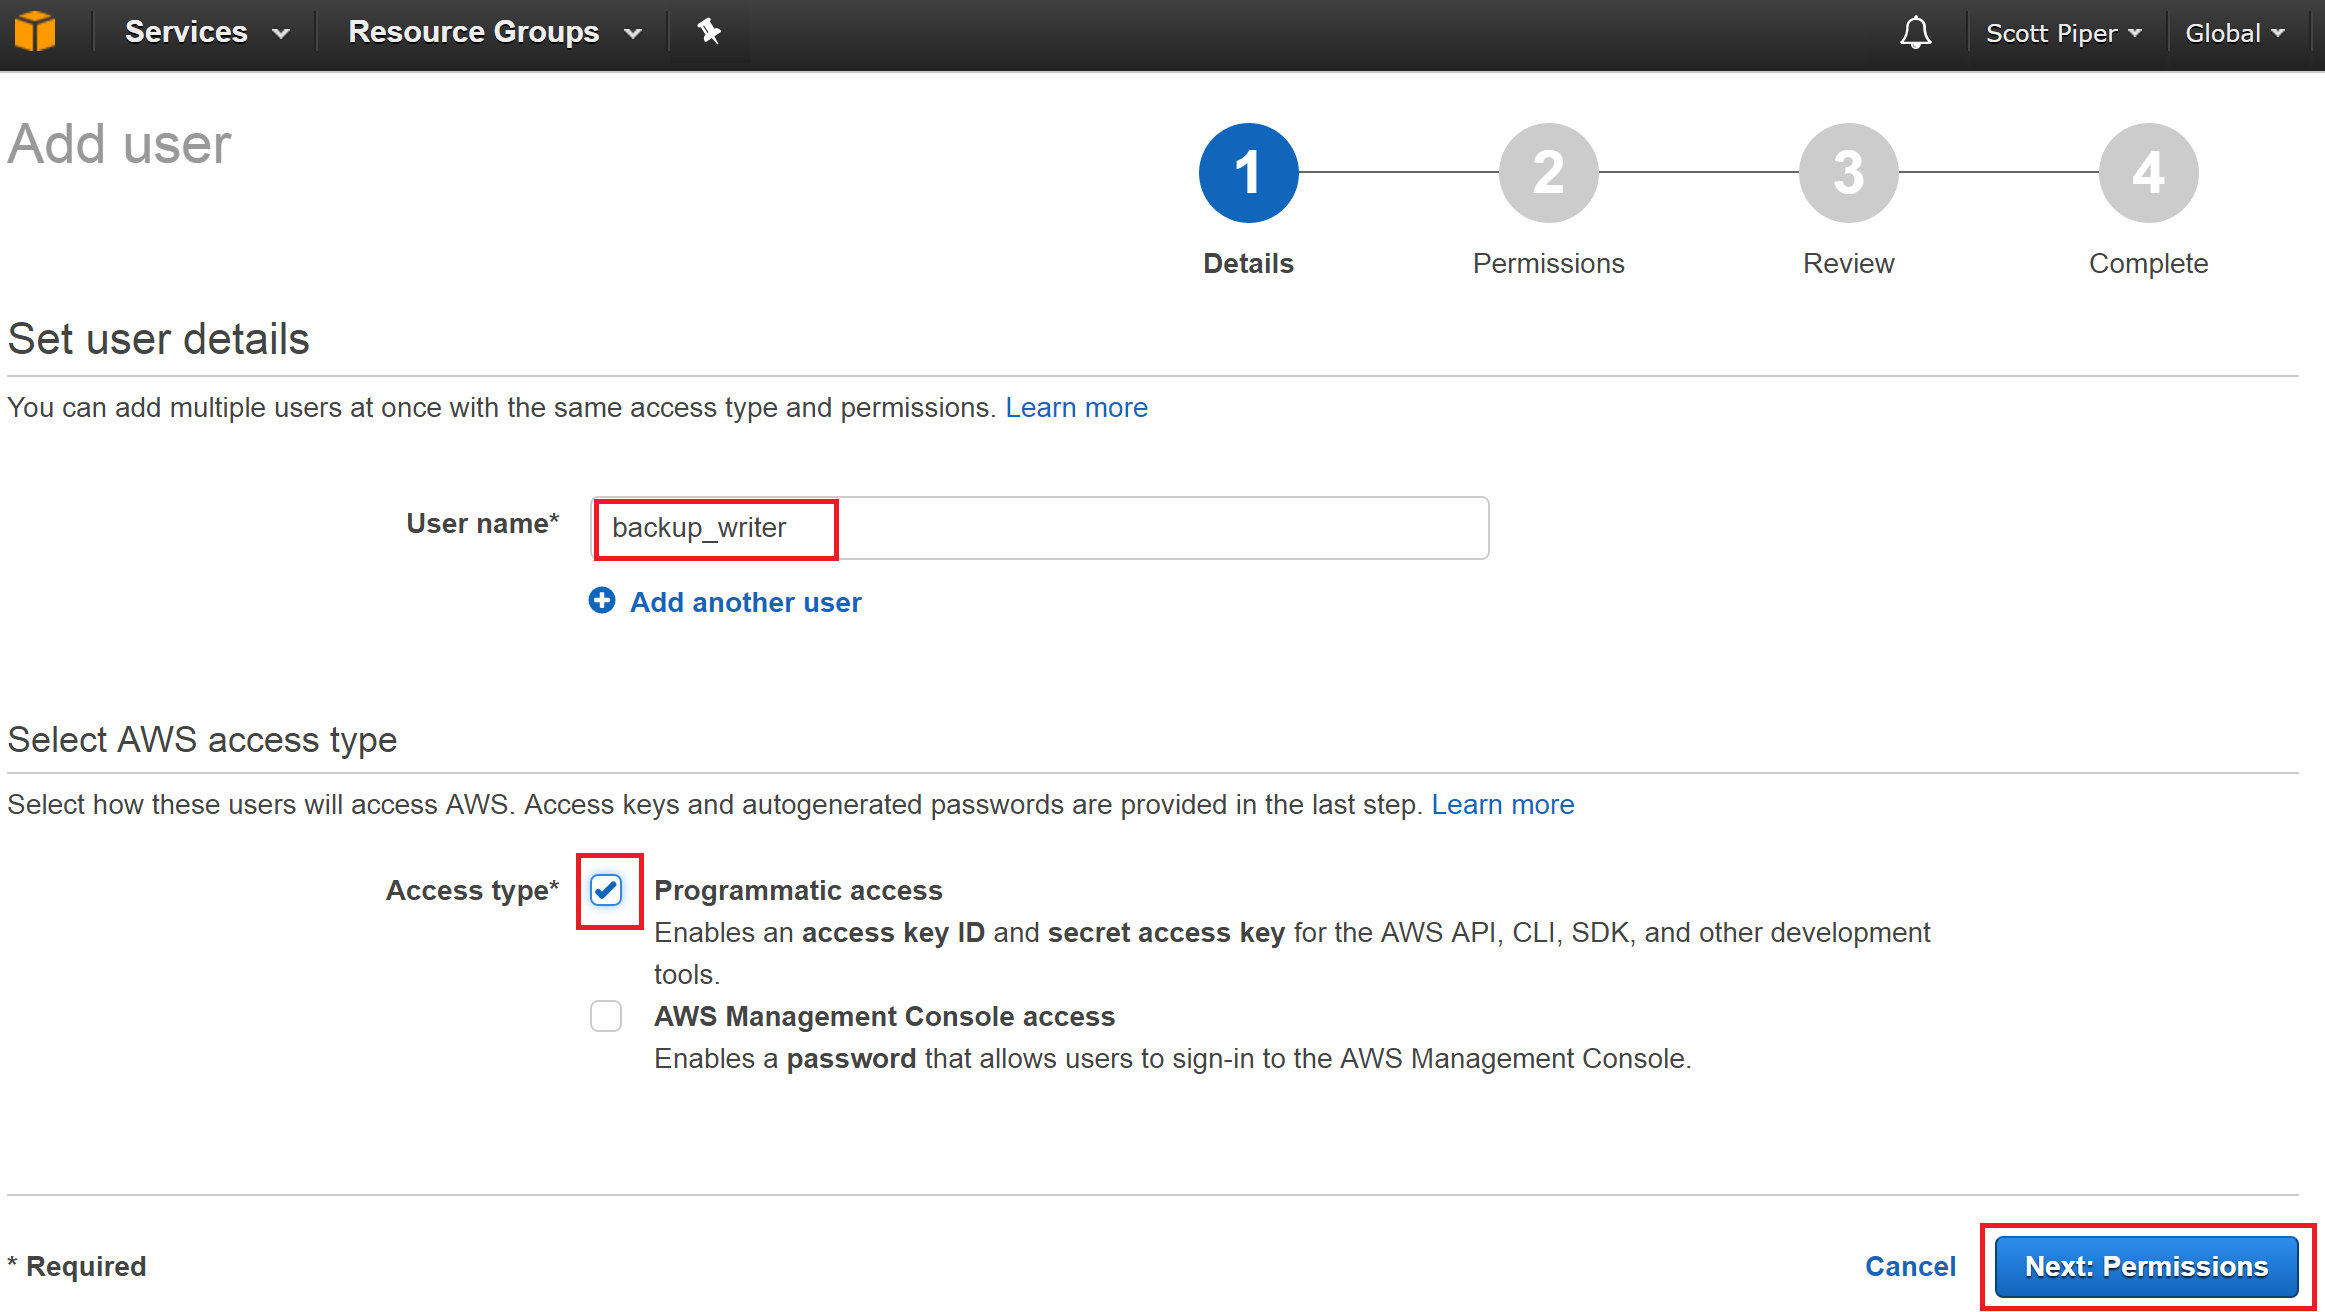
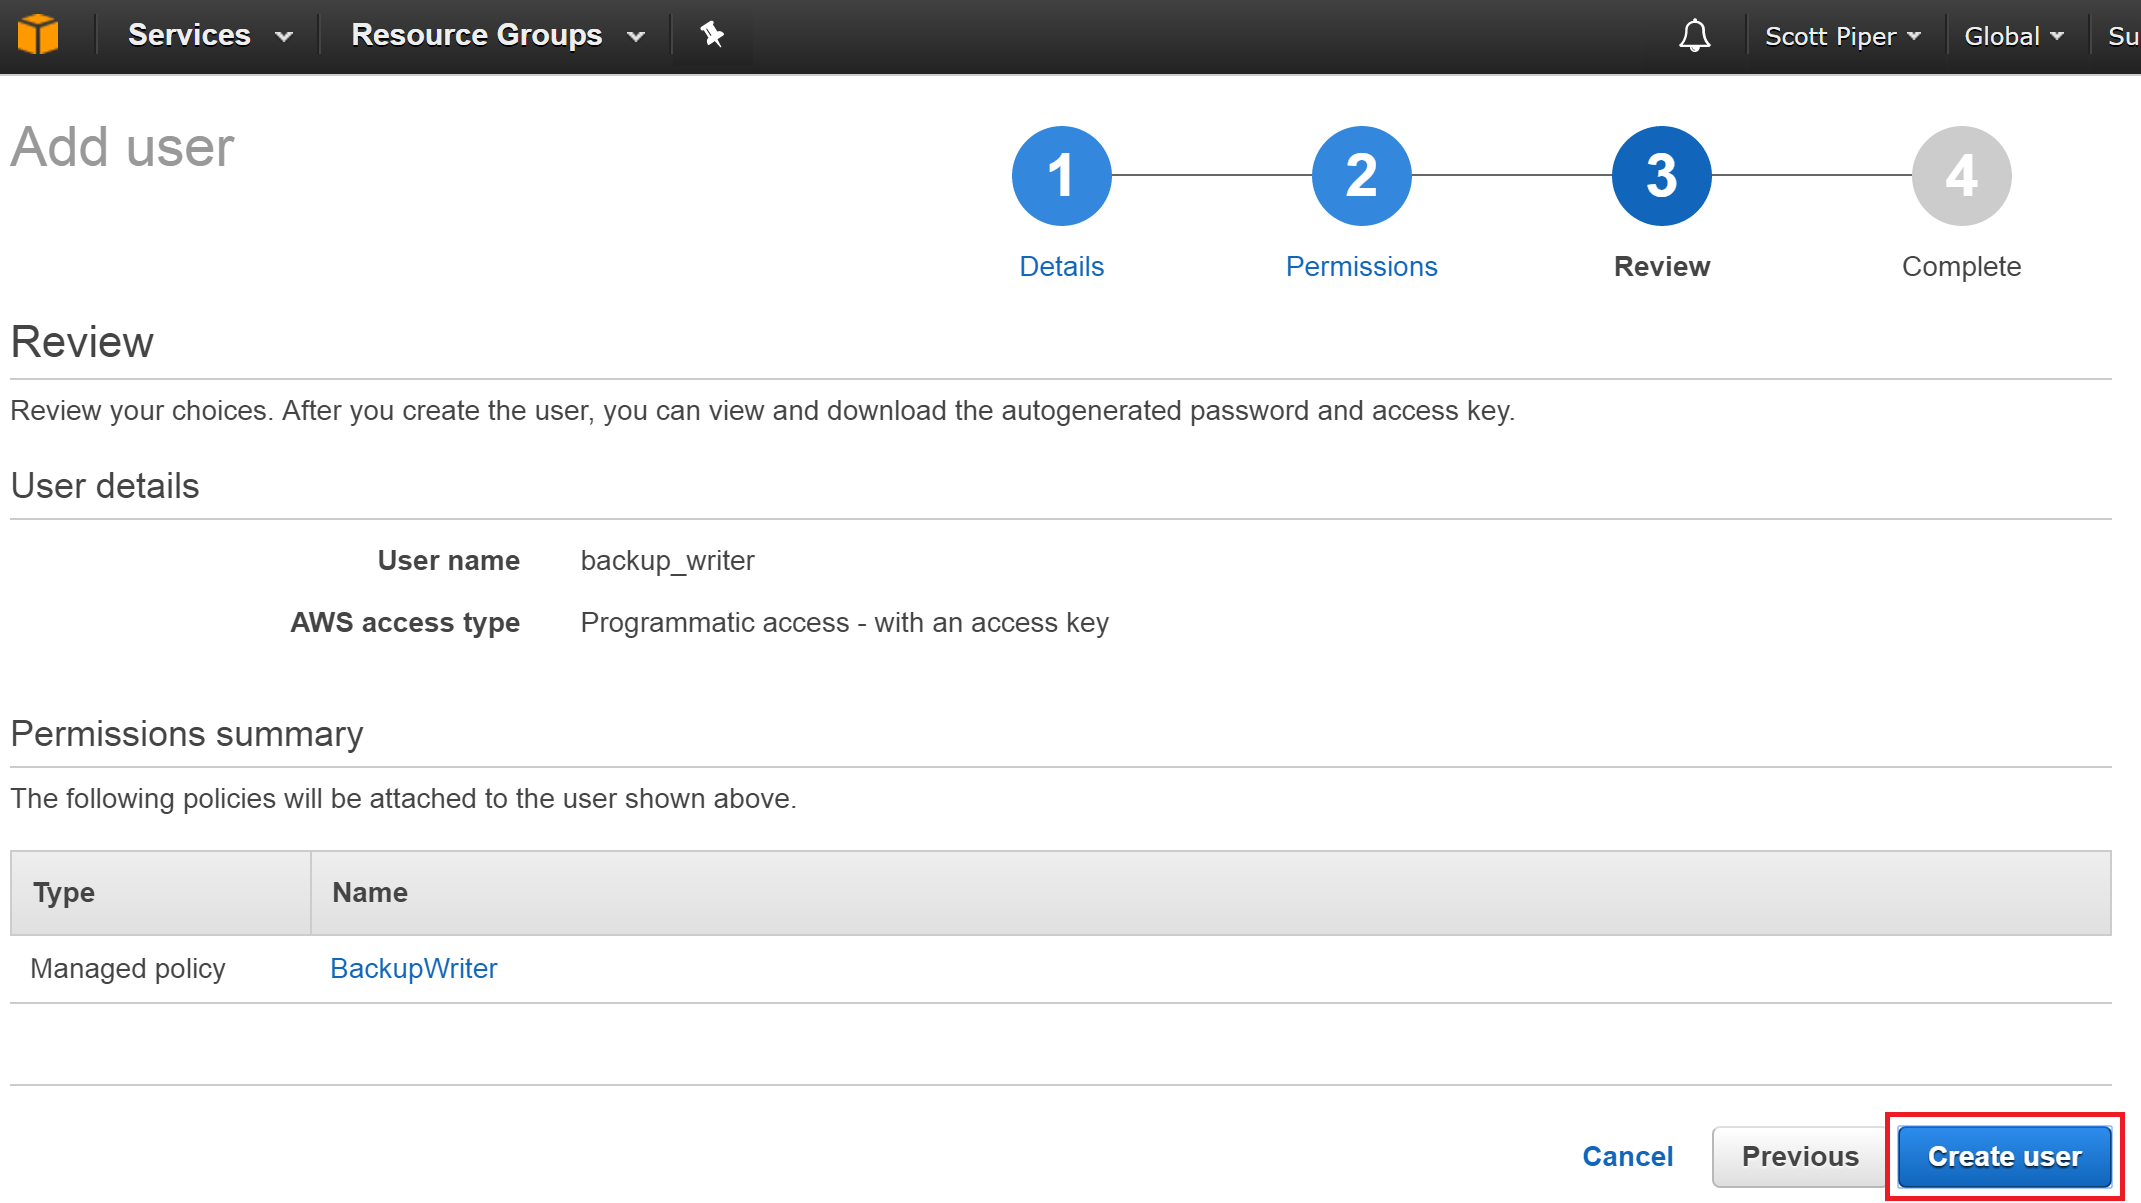
Name the user “backup_writer”, check the box for “Programmatic access”, and click “Next: Permissions”.
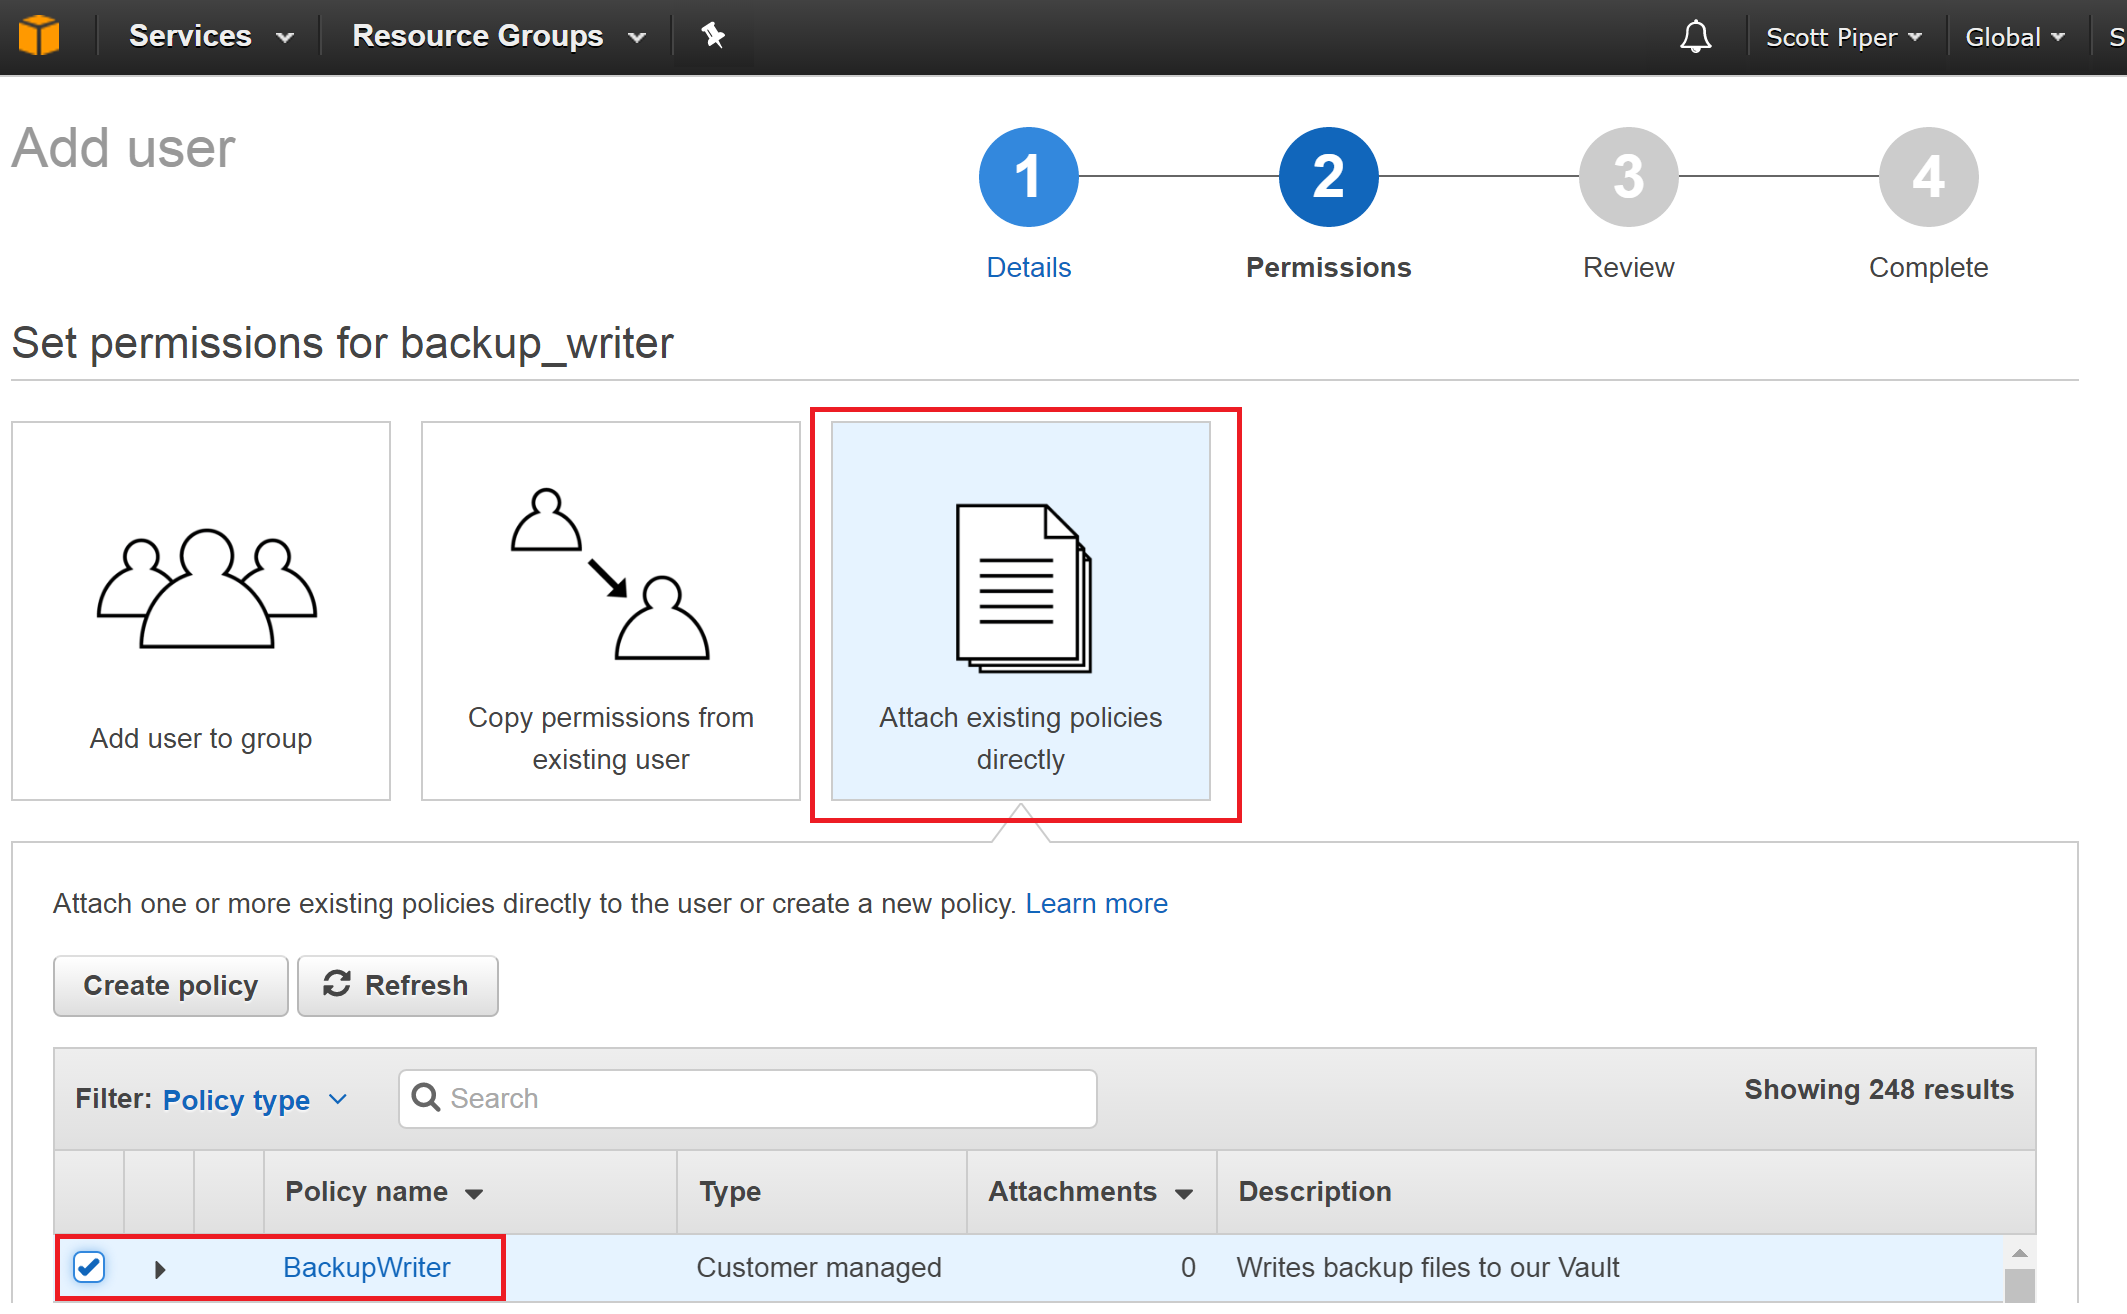
Click “Attach existing policies directly”, and select our “BackupWriter” policy.
Create the user.
Once created, it will show you an Access key ID and Secret access key, which can be thought of as a username and password for the user. Write these down to use later.
Send backups
Install the command line tools
We’ll be writing our backups from a Debian Linux system. First, install the command-line tools:
sudo apt-get install awscli
Configure it using the Access key ID and Secret access key from when you created the backup_writer user. If you need to, you can create a new access key for that user and delete the old one. I also use the region us-east-1 (Virginia) and the output format json.
user@ubuntu:~$ aws configure
AWS Access Key ID [None]: AKXXXXXXXXXXXXXXXXXXX
AWS Secret Access Key [None]: XXXXXXXXXXXXXXXXXXXXXXXXXXXXXXXXXXXXXXXX
Default region name [None]: us-east-1
Default output format [None]: json
This stores your credentials as plain-text in ~/.aws/credentials
Send files
If you followed my guide on Creating Disaster Recovery backups you should have a file like 201701291452-backupmaker.yourcompany.com-backup.tar.gz.enc that you want to backup. We send it as follows:
aws glacier upload-archive --body 201701291452-backupmaker.yourcompany.com-backup.tar.gz.enc --account-id - --vault-name summitroute_backup --archive-description 201701291452-backupmaker.yourcompany.com-backup

# Returns:
#{
#    "archiveId": "GjJoudd9hC3onlE1ZLof0T3vFRw7XSVHIW4V07GtwF5sf61BKBNF-sZkNbOPcsUID7qzfvzDRQTSOAqdNI7GiUVi97BGZYu80Y9m4cNRzGnMV6WN82yEdQuoAJ5x_BsRkrWmswTbHA",
#    "location": "/XXXXXXXXXXXX/vaults/summitroute_backup/archives/GjJoudd9hC3onlE1ZLof0T3vFRw7XSVHIW4V07GtwF5sf61BKBNF-sZkNbOPcsUID7qzfvzDRQTSOAqdNI7GiUVi97BGZYu80Y9m4cNRzGnMV6WN82yEdQuoAJ5x_BsRkrWmswTbHA",
#    "checksum": "a948904f2f0f479b8f8197694b30184b0d2ed1c1cd2a1ec0fb85d299a192a447"
#}
Your file has now been uploaded, and you can sleep peacefully.
Create accounts for others to retrieve the backups
Similar to creating our “BackupWriter” policy, create a policy called BackupReader with the following permissions (change 1234567890 to your account number).
{
    "Version": "2012-10-17",
    "Statement": [
        {
            "Action": [
                "glacier:DescribeJob",
                "glacier:DescribeVault",
                "glacier:GetDataRetrievalPolicy",
                "glacier:GetJobOutput",
                "glacier:GetVaultAccessPolicy",
                "glacier:GetVaultLock",
                "glacier:GetVaultNotifications",
                "glacier:ListJobs",
                "glacier:ListMultipartUploads",
                "glacier:ListParts",
                "glacier:ListTagsForVault",
                "glacier:ListVaults",
                "glacier:InitiateJob"
            ],
            "Effect": "Allow",
            "Resource": "arn:aws:glacier:us-east-1:1234567890:vaults/summitroute_backup"
        }
    ]
}
Once you’ve created a new user, you can configure the AWS tools on a different system to be able to read your backups.
For testing on the same system as your writer, you can create a second profile for the aws command to use by running aws configure --profile backupreader. Then when you need to make aws calls, you’ll use aws glacier --profile backupreader ... You do not want to leave both the reader and writer permissions on the same system though.
Download backups
As mentioned previously, Glacier takes up to 5 hours to retrieve your backups, so downloading them requires multiple steps. The first step is to initiate a job request to make them available for download:
aws glacier initiate-job --vault-name summitroute_backup --account-id - --job-parameters '{"Type": "archive-retrieval", "ArchiveId": "GjJoudd9hC3onlE1ZLof0T3vFRw7XSVHIW4V07GtwF5sf61BKBNF-sZkNbOPcsUID7qzfvzDRQTSOAqdNI7GiUVi97BGZYu80Y9m4cNRzGnMV6WN82yEdQuoAJ5x_BsRkrWmswTbHA"}'
# Returns:
# {
#    "jobId": "No-vD4Wb4MOUxRIpmsbDXW5AzMiie0O0DxCDjJdyppF2MkyXXOyjw0hQBeWI7MA0Rl1n5kwQjGRkE-Lv53CiJ9pcZVeA",
#    "location": "/1234567890/vaults/summitroute_backup/jobs/No-vD4Wb4MOUxRIpmsbDXW5AzMiie0O0DxCDjJdyppF2MkyXXOyjw0hQBeWI7MA0Rl1n5kwQjGRkE-Lv53CiJ9pcZVeA"
# }
Now you can periodically check the status of your job:
aws glacier --profile god describe-job --vault-name summitroute_backup --account-id - --job-id No-vD4Wb4MOUxRIpmsbDXW5AzMiie0O0DxCDjJdyppF2MkyXXOyjw0hQBeWI7MA0Rl1n5kwQjGRkE-Lv53CiJ9pcZVeA

# Returns:
# {
#    "JobId": "No-vD4Wb4MOUxRIpmsbDXW5AzMiie0O0DxCDjJdyppF2MkyXXOyjw0hQBeWI7MA0Rl1n5kwQjGRkE-Lv53CiJ9pcZVeA",
#    "StatusCode": "InProgress",
#    "Action": "ArchiveRetrieval",
#    "ArchiveSizeInBytes": 12,
#    "Completed": false,
#    "CreationDate": "2017-01-29T18:57:21.211Z",
#    "VaultARN": "arn:aws:glacier:us-east-1:1234567890:vaults/summitroute_backup",
#    "ArchiveSHA256TreeHash": "a948904f2f0f479b8f8197694b30184b0d2ed1c1cd2a1ec0fb85d299a192a447",
#    "RetrievalByteRange": "0-11",
#    "SHA256TreeHash": "a948904f2f0f479b8f8197694b30184b0d2ed1c1cd2a1ec0fb85d299a192a447",
#    "ArchiveId": "GjJoudd9hC3onlE1ZLof0T3vFRw7XSVHIW4V07GtwF5sf61BKBNF-sZkNbOPcsUID7qzfvzDRQTSOAqdNI7GiUVi97BGZYu80Y9m4cNRzGnMV6WN82yEdQuoAJ5x_BsRkrWmswTbHA"
# }
We need to wait until Completed is true. A successful retrieval will look like this:
{
    "ArchiveId": "GjJoudd9hC3onlE1ZLof0T3vFRw7XSVHIW4V07GtwF5sf61BKBNF-sZkNbOPcsUID7qzfvzDRQTSOAqdNI7GiUVi97BGZYu80Y9m4cNRzGnMV6WN82yEdQuoAJ5x_BsRkrWmswTbHA",
    "StatusMessage": "Succeeded",
    "CreationDate": "2017-01-29T18:57:21.211Z",
    "StatusCode": "Succeeded",
    "CompletionDate": "2017-01-29T22:47:24.136Z",
    "JobId": "No-vD4Wb4MOUxRIpmsbDXW5AzMiie0O0DxCDjJdyppF2MkyXXOyjw0hQBeWI7MA0Rl1n5kwQjGRkE-Lv53CiJ9pcZVeA",
    "RetrievalByteRange": "0-11",
    "Action": "ArchiveRetrieval",
    "Completed": true,
    "SHA256TreeHash": "a948904f2f0f479b8f8197694b30184b0d2ed1c1cd2a1ec0fb85d299a192a447",
    "ArchiveSHA256TreeHash": "a948904f2f0f479b8f8197694b30184b0d2ed1c1cd2a1ec0fb85d299a192a447",
    "ArchiveSizeInBytes": 12,
    "VaultARN": "arn:aws:glacier:us-east-1:1234567890:vaults/summitroute_backup"
}
You can also list all jobs with:
aws glacier list-jobs --vault-name summitroute_backup --account-id -
Once your ArchiveRetrieval is complete, you can download the file with:
aws glacier get-job-output --vault-name summitroute_backup --account-id - --job-id No-vD4Wb4MOUxRIpmsbDXW5AzMiie0O0DxCDjJdyppF2MkyXXOyjw0hQBeWI7MA0Rl1n5kwQjGRkE-Lv53CiJ9pcZVeA 201701291452-backupmaker.yourcompany.com-backup.tar.gz.enc
# Returns:
# {
#    "acceptRanges": "bytes",
#    "status": 200,
#    "archiveDescription": "201701291452-backupmaker.yourcompany.com-backup",
#    "contentType": "application/octet-stream",
#    "checksum": "a948904f2f0f479b8f8197694b30184b0d2ed1c1cd2a1ec0fb85d299a192a447"
#}
You will then have your backup file locally.
Your file will be available for download for 24 hours before you need to iniate another job to retrieve it.
Other considerations
- Multipart uploads: In my examples, I upload the file in one step and downloaded it in one step. It is also possible to upload portions of a file at a time. This is mostly useful so that you don’t spend hours uploading a file only for it to fail for some reason and you have to start all over again. By uploading files in chunks, you could ensure that you only need to resend the last few minutes worth a file upload.
- Vault Access Policies and Vault Lock policies: You can create special policies on your Glacier Vaults in addition to IAM restrictions. These can do things like ensure Vaults are not deleted that are less than 365 days old.
- Provisioned capacity for expedited retrievals: As mentions, retrievals can take up to 5 hours, but can be reduced to as little as 5 minutes. This is accomplished using Provisioned capacity.
Conclusion
AWS has created a very mature platform to use as storage for Disaster Recovery. It provides all sorts of permissions and configurations to suit any need. This can be very complicated if your needs are simple and you just want an alternative cloud provider to use for backup storage, but I highly recommend using AWS for this purpose.


